Career III 300 Owner’s Manual
| Mechanical system | Precharged pneumatic, Side lever-action repeating rifle. | 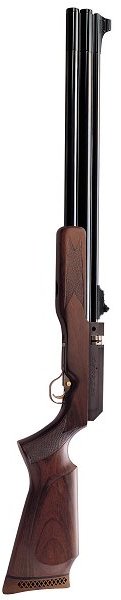 |
| Power storage | Two built-in air chambers(approximately 300cc total). | |
| Caliber/Ammunition | .177 cal. (4.5 mm) .20 caliber (5 mm) .22 caliber (5.5 mm) .25 cal. (6.35 mm) |
|
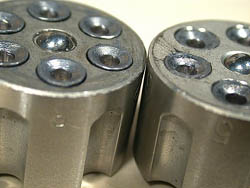
| Magazine capacity | 6 pellets | |
| Total length | 41.3" | |
| Weight | 7 lbs. | |
| Muzzle velocity | Adjustable: 400 FPS to 1250 FPS for 7.9 grain pellets .177Cal |
|
| Front Sight | Hunting style ramp with bead. | |
| Rear sight | Fully adjustable open-square notch. | |
| Stock | Indonesian Walnut. | |
| Trigger | Two stage trigger, adjustable to appoximately two pounds. | |
| Barrel | 23.75" | |
| Safety | Positive Cross-Bolt |
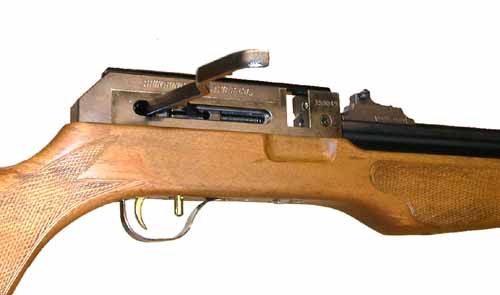
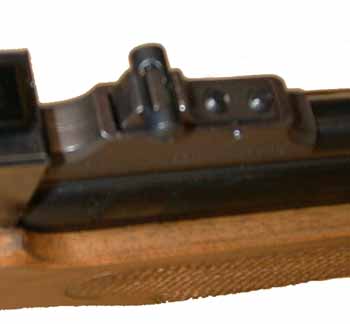
To Remove the Magazine
- The magazine clip is located on the top side of the rifle’s receiver.
- Before proceeding, keep the rifle pointed in a safe direction at all times.
- To remove it from the rifle, cock the rifle . DO NOT RETURN THE LEVER TO THE CLOSED POSITION. Leave it in it’s open (half -cocked) position. Pull magazine out from the breech.
To Feed Pellets from the Magazine:
- Before proceeding, keep the rifle pointed in a safe direction at all times.
- Engage the safety.
- Cock the rifle. Leave it in it’s open (half -cocked) position.
- Insert the loaded magazine.
- Return the lever to its closed position
- Release the safety. The rifle is ready to fire.
To Clean the Barrel:
- If the groups you shoot are off, the barrel probably needs cleaning,
- Before proceeding, keep the rifle pointed in a safe a direction at all times.
- Engage the safety.
- Remove the magazine.
- Do not clean the barrel under charge. Empty the rifle’s air pressure, completely by dry firing it in a safe direction. It is best to clean the rifle when the rifle’s air pressure is already low so you won’t have much air to discharge.
- Do not use wood doweling for a cleaning rod. A broken rod in the barrel is extremely difficult to remove. A coated metal rod designed for cleaning air gun works best,
- Saturate the, cloth patches with cleaning fluids or lubricants designed for air gun barrels.
- Using the cleaning rod, push the saturated cloth patch through the muzzle, until it exits at the other and.
- There is no need to over-clean the barrel. Swab the barrel s bore with cloth patches until the last one comes out clean.
- Never use an abrasive cleaning agent or metal brush.
To Clear the Barrel of a Jammed Pellet(s):
- Before proceeding, keep the rifle pointed in a safe direction at all times,
- Engage the safety.
- Cock the rifle . DO NOT RETURN THE LEVER TO THE CLOSED POSMON. Leave it in open (half-cocked) position.
- Remove the magazine.
- Use a metal rod designed for cleaning air gun’s to clear the barrel. Push it through from the muzzle to the other end. The jammed pellet should come out.
Dry Firing the Rifle:
Dry firing it does not harm this rifle.
Dry firing it does not harm this rifle.
To Load the Magazine:
- The magazine clip is located on the top side of the rifle’s receiver.
- Before proceeding, keep the rifle pointed in a safe direction at all times.
- To load it into the rifle, cock the rifle . DO NOT RETURN THE LEVER TO THE CLOSED POSITION. Leave it in it’s open (half -cocked) position. Push magazine into the breech.
To Uncock the Rifle:
- Before proceeding, keep the rifle pointed in a safe direction at all times.
- Engage the safety.
- Remove the magazine clip.
- Remember, point the rifle in la safety direction in case the rifle discharges accidentally.
- Hold the lever securely and pull it slightly past its stopping point so that you feel some resistance.
- Still holding the lever securely, release the safety and pull the trigger. You will feel the lever pull in the direction of the trigger. Gently ease the lever back into its closed position.
- Point the rifle in a safe direction and pull the trigger to confirm the rifle is not in a firing mode.
To Charge the Rifle:
NOTE: USE COMPRESSED AIR ONLY. Other gases are dangerous and will void the warranty. Under no condition should this rifle be filled over 3,000 PSI. This is dangerous and will void the warranty. The quick-fill dust cap is located at the end of the lower air reservoir tube below the barrel. DO NOT REMOVE IT! Simply rotate the cap in either direction until the female receptor port is exposed. After you finish re-filling the rifle, rotate the dust Gap to close off the receptor port. Any dirt here can cause the rifle’ s valves to fail.
NOTE: USE COMPRESSED AIR ONLY. Other gases are dangerous and will void the warranty. Under no condition should this rifle be filled over 3,000 PSI. This is dangerous and will void the warranty. The quick-fill dust cap is located at the end of the lower air reservoir tube below the barrel. DO NOT REMOVE IT! Simply rotate the cap in either direction until the female receptor port is exposed. After you finish re-filling the rifle, rotate the dust Gap to close off the receptor port. Any dirt here can cause the rifle’ s valves to fail.
To Charge the Rifle with the Hand Pump:
- The Easy up 10 Hand Pump is the most convenient method to charge your rifle. This sturdy pump is light to carry. It comes with a convenient carrying bag to accompany the rifle in the field or wherever you use it.
- To ensure safe operation, you should refill the rifle without the distraction of others nearby, especially children or animals.
- Be sure the rifle is unloaded.
- Lay the rifle pointed in a safe direction next to the pump. The pump’s adapter probe should be within easy reach of the rifle’s adapter port.
- Hand tighten the bleeder valve on the base of the pump.
- Carefully insert the adapter probe from the pump hose into the rifle’s exposed receptor port, taking care not to snag the double “O” ring on the edges of the dust cap.
- Use silicone grease (sold in scuba diving stores) to dress the “O” rings before each fill.
Caution: Do not use other products that may have a low flash point. It is extremely dangerous to use such products in this high-pressure area. This can lead to an explosion. - Pump the rifle twelve times. This should prime the hose enough to allow you to take an initial reading of the rifle s current pressure level. If you hear air leaking, carefully check all connections. If you cannot resolve the air leaks, return the pump immediately to your dealer for inspection.
- Begin pumping in 20 stroke sets, taking a reading each time of the pressure level and allowing at least a 2 minute cooling period in-between each set, especially when the pressure reaches 2500 p.s.i. (175 k g/CM2). Do not exceed 3,000 p.s.i.
- The best technique to operate the pump is to use your upper body weight to push down on the pump, keeping your arms rigid. This method is less fatiguing than using only your arm strength to operate the pump.
- Once the rifle has reached the desired pressure, open the bleeder valve on the bass of the pump. You will hear a loud rush of air escape from the small hole in the bass of the pump. You can now safely remove the pump’s probe adapter from the rifle’s receptor port.
To Charge the Rifle from a Scuba Tank:
- To ensure safe operation, you should refill the rifle without the distraction of others nearby, especially children or animals.
- Be sure the rifle is unloaded.
- Lay the rifle pointed in a safe direction next to the scuba tank. The adapter probe from the scuba tank should be within easy reach of the rifle’s adapter port.
- Connect the adapter hose to the scuba tank (standard 3,000 p.s.i.)
- Hand tighten the bleeder valve on hose.
- Carefully insert the adapter probe from the other end of the hose into the rifle’s exposed receptor port, taking care not to snag the double “O” ring on the edges of the dust cap.
- Use silicone grease (sold in scuba diving stores) to dress the “O” rings before each fill. Caution: Do not use other products that may have a low flash point. It is extremely dangerous to use such products in this high pressure area. This can lead to an explosion.
- Open the main valve to allow a slow, controlled infusion of air. If you hear air leaking, carefully check all connections. If you cannot resolve the air leaks, return the hose adapter unit to your dealer for inspection.
- Once the desired air pressure is reached, CLOSE THE MAIN VALVE on the scuba tank. Do not exceed 3,000 p.s.i.
- OPEN THE BLEED VALVE. You will hear a loud rush of air escape from the bleeder valve.
- You can now safely remove the hose’s probe adapter from the rifle’s receptor port. Built-in Pressure Gauge:
- The rifle’s pressure gauge is located at the end of the lower air reservoir tube.
- The pressure gauge gives an approximate reading and can differ on each rifle. For example, charged with 2500 p.s.i. one built-in pressure gauge might show 19, while another rifle’s pressure gauge might show 21 with the same 2,500 p.s.i. Charge.
- Use the gauge as a convenient method to quickly check your power level for accurate shooting.
a) For example, note the pressure level on the gauge after you have fully charged the rifle (i.e. 3,000 p.s.i.).
b) Then check the gauge again when you first notice a change in the impact point due to the pressure dropping from firing a long series of shots.
c) This will allow you to anticipate from checking the level on the gauge when your point of impact will change due to the air pressure decreasing in the rifle.
d) Before long you will be able to interpret the rifle’s gauge and judge how many shots are left before the rifle needs to be refilled.
Storing the Rifle Under Charge:
This rifle can be stored under charge. However, it must be treated safely, as with any loaded gun. When not in use, we highly recommend you store this rifle in a lock rifle safe.
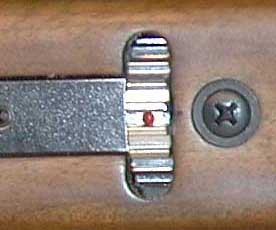
Adjusting the power:
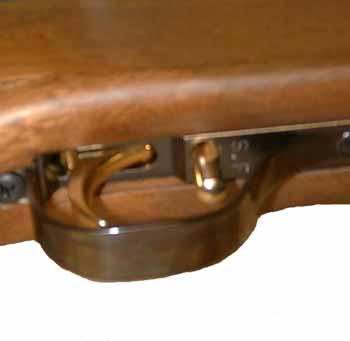
A 12-stage positive-stop power wheel is located under the rifle, just ahead of the trigger guard. It has a yellow triangle. Color-coded dots next to the wheel show the direction to rotate the wheel to increase or decrease velocity. The green dot is low power, the yellow is Medium power and the red is high power. To adjust the power wheel:
A 12-stage positive-stop power wheel is located under the rifle, just ahead of the trigger guard. It has a yellow triangle. Color-coded dots next to the wheel show the direction to rotate the wheel to increase or decrease velocity. The green dot is low power, the yellow is Medium power and the red is high power. To adjust the power wheel:
- Before proceeding, keep the rifle pointed in a safe direction at all times.
- Engage the safety.
- Remove the magazine clip.
- Check carefully to see that a pellet has not been chambered into the barrel. If you are in doubt, remove the magazine clip, aim the rifle in a safe direction, and fire the rifle with at least medium power to discharge the pellet.
- Cock the rifle’s lever, leaving it in an open position (i.e. half-cocked). This makes turning the power wheel easier, especially in the lower power ranges.
- Rotate the power wheel in the direction of the dots, to increase or decrease the power.
- When you are finish, uncock the rifle or you ran cock the rifle and discharges in a safe direction. Other comments regarding various power settings:
- It is possible to double-load and jam more than one pellet with the rifle set in the low power range. Be sure a fired pellet has left the barrel before cocking the rifle for the next shot.
- At 3,000 p.s.i. using .177 cal. Crosman Premiers (7.9 grain) pellets, the range of power is from a low of about 400 f.p.s. to a high of about 1.250 f.ps. Use a chronograph to establish the velocity relative to the power settings. However, shooting the rifle and simply nothing the pellet s performance may be all you may need.
- It is possible to maintain a consistent velocity at low or medium settings even though air pressure has dropped enough to affect point of impact by turning the power wheel to a higher setting.
Adjusting the rear Sight:
Before proceeding, keep the rifle pointed in a safe direction at all times. Move the rear sight in the same direction you wish to move the point of impact. Adjustment for windage (left and right) and elevation (up and down) is accomplished by the use of two separate sets of screws. The two screws in each set work in conjunction with each other. YOU WILL ALWAYS LOOSEN ONE SCREW BEFORE YOU TIGHTEN THE OTHER. The two controlling screws for windage are located on both sides of the notched sight. To move the sight and point of impact to the left:
Before proceeding, keep the rifle pointed in a safe direction at all times. Move the rear sight in the same direction you wish to move the point of impact. Adjustment for windage (left and right) and elevation (up and down) is accomplished by the use of two separate sets of screws. The two screws in each set work in conjunction with each other. YOU WILL ALWAYS LOOSEN ONE SCREW BEFORE YOU TIGHTEN THE OTHER. The two controlling screws for windage are located on both sides of the notched sight. To move the sight and point of impact to the left:
- Loosen the setscrew on the left side and tighten the screw on the right side in the same small increment. As you tighten the screw on the right side, the rear sight will move left. It will only move as far as you had allowed when you loosened the left screw.
- For example, turn the left screw one-half of a turn and then turn the right screw one-half of a turn or until it is snug (do not over-tighten).
- When you are finished adjusting the windage, check to be sure the setscrews on, both sides are tightened snuggle. To move the sight and point of impact to the right:
- Loosen the setscrew on the right side and tighten the screw on the left side in the same small increment. As you tighten the screw on the left side, the rear sight will move right. It will only move as far as you had allowed when you loosened the right screw.
- For example, turn the right screw one-half of a turn and then turn the left screw one-half of a turn or until it is slug (do not over-tighten).
- When you are finished adjusting the windage, check to be sure the set screws on both sides are tightened snuggle. The two controlling screws for elevation are located ahead of the notched sight. To move the point of impact higher:
- Loosen the front screw and tighten the rear screw.
- For example, turn the front screw one-half of a turn and then turn the rear screw one-half of a turn or until it is snug (do not over-tighten). To move the point of impact lower:
- Loosen the rear screw and tighten the front screw.
- For example, turn the rear screw one-half of a turn and then turn the front screw one-half of a turn or until it is snug (do not over-tighten).
REMEMBER, DO NOT OVER TIGHTEN, First loosen the first screw and then tighten the other snuggle. The above two adjustments are not difficult to make. However, before proceeding, think out carefully what you are trying to accomplish and exercise good judgment and caution as you are making the adjustments.
Recommended Lubricants:
- Silicone grease (solid in scuba diving stores) for the ‘O’ rings on the adapter probe.
- Dow Corning Molykote 33 for the exposed metal parts inside the receiver cover.
Safety Mechanism:
- Before proceeding, keep the rifle pointed in a safe direction at all times.
- The pin safety is the pin located directly before the trigger.
- To engage the safety push the pin completely to the left "S".
- To release the safety push the bolt to the right "F".
- It is a good idea to set and release the safety several times before cocking the rifle to become familiar with this action. Point the rifle in a safe direction and pull the trigger each time to get the feel of the safety.
Safety
- Always handle your rifle as if is loaded.
- Use only the recommended Pellets.
- Always point the muzzle in a safe direction.
- Remember that this is a high efficiency rifle capable of propelling a pellet over 600 yards.
- Always check a rifle to see if it is loaded when removed from storage or received from another person.
- Never transport your rifle when loaded.
- Do not aim at people or pets. Never shoot at a hard surface or water.
- Be sure that your target and backstop are safe.
- Make sure you can control the direction of the muzzle if you stumble or fall.
- Unload your air rifle before giving it to another person.
- Always wear shooting glasses when shooting your rifele.
- Always store your rifle in a secure location out of the reach of children or unskilled users.
- When transferring this rifle be sure to include this instruction manual.
- Repairs to this rifle should only be done by Authorized Service Station.
- Never leave a loaded gun unattended.